- What’s WDAC?
- Examples
- Hunting Events in the Windows Event Log
- Pros and Cons
- Conclusion
What’s WDAC?
Windows Defender Application Control (WDAC) is a technology introduced with Windows 10 that allows organizations fine grained control over the drivers and applications that are allowed to run on their Windows machines. WDAC policies apply to the entire machine, and affect all users of the device. According to Microsoft’s documentation, these policies can be based on many things such as:
- Attributes of the codesigning certificate(s) used to sign an app and its binaries
- Attributes of the app’s binaries that come from the signed metadata for the files, such as Original Filename and version, or the hash of the file
- The reputation of the app as determined by Microsoft’s Intelligent Security Graph
- The identity of the process that initiated the installation of the app and its binaries (managed installer)
- The path from which the app or file is launched (beginning with Windows 10 version 1903)
- The process that launched the app or binary
What About AppLocker?

AppLocker has been around for a long time, but what makes WDAC so special? Why is Microsoft telling organizations to use WDAC for security rather than AppLocker? Well, AppLocker, while useful in defense-in-depth security, is not ideal for providing robust protection against threats. That’s where WDAC comes into play. WDAC is very much a security-focused solution that allows for more targeted rules than with AppLocker. That isn’t to say that AppLocker should be retired however, as it still can provide granular control of applications coinciding with WDAC. In other words, AppLocker is much more of a general “I don’t want you to use this app” than WDAC, which is a “I’m blocking this potential threat.”
As per Microsoft’s WDAC documentation, there are still reasons to deploy AppLocker, including when:
- You have a mixed Windows operating system (OS) environment and need to apply the same policy controls to Windows 10 and earlier versions of the OS.
- You need to apply different policies for different users or groups on shared computers.
- You don’t want to enforce application control on application files such as DLLs or drivers.
Single vs Multiple Policy Format
How are WDAC policies structured? Well, at a high level you have:
- Multiple Policy Format
- Base Policy
- Supplemental Policy
- Single Policy Format
These formats are how WDAC implements its ruleset - through compiled .xml files.
The following sections will provide an in-depth description on each of these
formats, but for now think about the difference between Single and Multiple
Policy Formats as the difference between Local and Domain Group Policy Objects
(GPOs) - you only get one Local GPO, while you can define many different Domain
GPOs to granularly control a device.
For guidelines on WDAC feature availability on specific versions of Windows, please reference the official Microsoft documentation.
Single Policy Format
Single Policy Format is exactly what the name describes - a single policy used to set WDAC rules. This specific format, while providing fewer options for granular control over the ruleset, is by far the most compatible one, as the Multiple Policy Format only functions on Windows 10 (1903) and newer. Thus, the Single Policy Format works on any Windows 10 device, including Windows Server 2016 and 2019.
For future reference, these policies are located at:
<EFI System Partition>\Microsoft\Boot\SiPolicy.p7b<OS Volume>\Windows\System32\CodeIntegrity\SiPolicy.p7b
Multiple Policy Format
Multiple policies can make up the overall ruleset used by WDAC. Therefore, it allows much more fine grained control over the WDAC ruleset than Single Policy Format. However, while it does grant control, it is not as compatible. In order to leverage Multiple Policy Format, the machine must be running Windows 10 (1903) and newer. Further, you must have the April 2024 update in order to have more than 32 policies in place at once, otherwise you will experience issues.
Now, in the above section I outlined that Multiple Policy Format contains Base Policy and Supplemental Policy, but what does that mean? Well, think of Multiple Policy Format as a city of buildings - the buildings have foundations (base policies) and each of those have structures on top that ultimately make the building (supplemental policies). While base policy doesn’t have to be limited in scale to accommodate supplemental policy, all supplemental policy does is extend the rules outlined in the base policy. This allows for some very creative ways of building rules because you can create various coverage areas to specifically target items of interest.
For future reference, these policies are located at:
<OS Volume>\Windows\System32\CodeIntegrity\CiPolicies\Active\{PolicyId GUID}.cip<EFI System Partition>\Microsoft\Boot\CiPolicies\Active\{PolicyId GUID}.cip
Signing Policies
Perhaps one of the best ways to ensure that WDAC policies are not tampered with is by signing them first. While doing this makes provides the highest level of protection available in Windows, it makes them extremely difficult to get rid of.
You can attain a code signing certificate by:
- Use Microsoft’s Trusted Signing service.
- Purchase a code signing certificate from one of the Microsoft Trusted Root Program participants.
- To use your own digital certificate or public key infrastructure (PKI) to issue code signing certificates, see Optional: Create a code signing certificate for Windows Defender Application Control.
Once you’ve obtained a code signing certificate, you can sign a WDAC policy using the following Microsoft document (or the following steps).
BEFORE YOU START
Consider the possible danger with using signed policies in your environment. While it’s true that signed policies provide the highest level of protection, they can also provide the greatest headache. If a signed policy is deployed, it’s really hard to safely get rid of. Further, if somehow a signed policy is deleted from the EFI partition of a windows machine after it’s already applied, prepare to suffer. If a windows machine attempts to boot without the signed policy after it’s been applied, it will not boot until a proper signed replacement policy is manually deployed.
Preparing to Sign
Before you even begin, signing a WDAC policy requires that you are using UEFI and secure boot.
- Open an elevated PowerShell window
- Initialize the following variables:
$PolicyPath=$env:userprofile+"\Desktop\" $PolicyName="Example_Policy" $Policy=$PolicyPath+$PolicyName+".xml" - Navigate to your desktop
cd $PolicyPath - If the WDAC policy doesn’t already have an
<UpdatePolicySigner>rule for the policy signing certificate, you need to add it. At least one of these rules must exist to convert the policy XML to binary format. To add this rule from your certificate file (.pfx,.cer, etc.), useAdd-SignerRule. Alternatively, if you purchased a code signing cert or issued your own, you may export the generated certificate file.Add-SignerRule -FilePath $Policy -CertificatePath <Path to exported certificate file> -Update -Supplemental - Remove the unsigned policy rule option using
Set-RuleOptionSet-RuleOption -FilePath $Policy -Option 6 -Delete - (Optional) Reset the policy ID and change the policy name using
SetCIPolicyIdInfoSet-CIPolicyIdInfo -FilePath "$Policy" -PolicyId "NEWID" -PolicyName "NEWNAME" - (Optional) Change the policy VersionEx using
Set-CIPolicyVersionSet-CIPolicyVersion -FilePath $Policy -Version 'A.B.C.D' - Convert the policy from
.xmlto binary format usingConvertFrom-CIPolicy$PolicyID= Set-CIPolicyIdInfo -FilePath $Policy -ResetPolicyID $PolicyID = $PolicyID.Substring(11) $CIPolicyBin = $env:userprofile + "\Desktop\" + $PolicyID + ".cip" ConvertFrom-CIPolicy $Policy $CIPolicyBin
Signing the Policy
If you either purchased a code signing certificate or issues one from your own PKI,
you may use SignTool.exe
to sign WDAC policies.
- Import the
.pfxcode signing certificate into the current user’s personal store on the same machine that the signing will happen. - Sign the WDAC policy
- Substitute
SigningCertwith the subject name of the certificate - Define or substitute
$CIPolicyBinwith the path to the WDAC policy (in binary format). This should have been defined as a variable in the previous section. - Substitute
PATH_TO_CERTwith the path of the directory that contains the.pfxfile (something likeC:\Windows\System32\)signtool.exe sign -v -n "SigningCert" -p7 "PATH_TO_CERT" -p7co 1.3.6.1.4.1.311.79.1 -fd sha256 $CIPolicyBin
- Substitute
- The command should have outputted a signed policy file with a
.p7extension, you must rename it to{GUID}.cipwhere “{GUID}” is the<PolicyId>from the original WDAC policy XML.
Deployment
Deploying WDAC can be a bit tricky, especially if you’re not using a “fancy” solution such as a Mobile Device Manager (MDM) or Microsoft Configuration Manager. This just leaves GPOs and scripts to do the job.
Group Policy Objects
One of my favorite things in this world has to be Group Policy Objects (GPOs). They provide a huge amount of control over a Windows machine, and for WDAC it’s no different…almost. Unfortunately, if you want to use Group Policy to deploy WDAC, you can ONLY use single-policy format. Otherwise, you’ll have to use something else like a script that pulls Multiple Policy Format files from a shared location and applies them.
Regardless of the limitation to only Single Policy Format, it’s still very easy to deploy WDAC through group policy. To start, open the Group Policy Management app on a Domain Controller (if you’re using Active Directory) or the Local Group Policy Editor (if you’re using a standalone machine). If you’re using the Group Policy Management app on a Domain Controller, edit either an existing or new policy.
Next, edit the setting located at Computer
Configuration\Policies\Administrative Templates\System\Device Guard\Deploy
Windows Defender Application Control to enable it and provide the path of
the single policy format file. Please note that the file name and extension
do NOT matter, so long as the contents of the file are valid - it will be
converted to SIPolicy.p7b regardless.
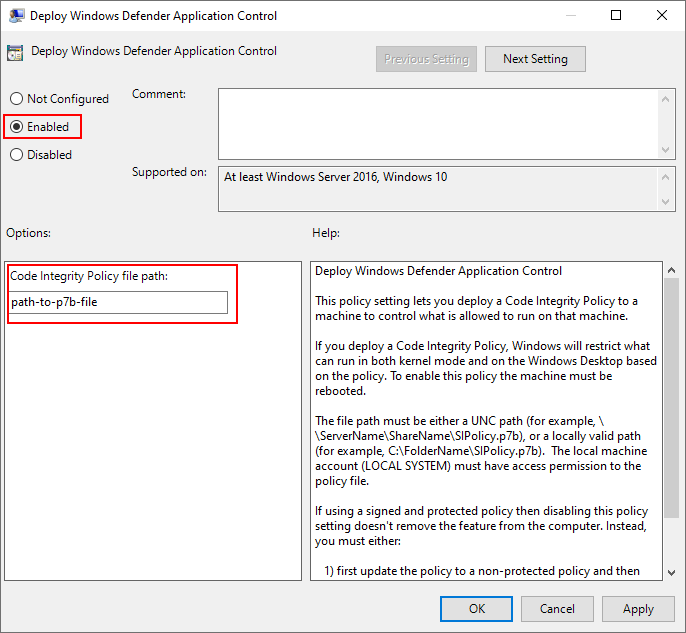
After applying these changes, reboot the machine to apply the WDAC policy.
Command Line
Because GPOs can take care of Single Policy Format, I’ll simply cover using scripts for Multiple Policy Format in this section.
Windows 11 22H2 and Above
Windows 11 22H2 and above makes it very easy to apply policies via the
CiTool. As per Microsoft:
# Policy binary files should be named as {GUID}.cip for multiple policy format files (where {GUID} = <PolicyId> from the Policy XML)
$PolicyBinary = "<Path to policy binary file to deploy>"
CiTool --update-policy $PolicyBinary [-json]
Windows 11, 10 (1903) and Above, and Server 2022 and Above
In order to use this procedure, you have to distribute the WDAC policy refresh tool to all endpoints you want to set WDAC on. Ensure that the WDAC policies you want allow the WDAC policy refresh tool or use a managed installer.
# Policy binary files should be named as {GUID}.cip for multiple policy format files (where {GUID} = <PolicyId> from the Policy XML)
$PolicyBinary = "<Path to policy binary file to deploy>"
$DestinationFolder = $env:windir+"\System32\CodeIntegrity\CIPolicies\Active\"
$RefreshPolicyTool = "<Path where RefreshPolicy.exe can be found from managed endpoints>"

Copy-Item -Path $PolicyBinary -Destination $DestinationFolder -Force
Repeat as necessary for all WDAC policies you want to apply.
& $RefreshPolicyTool
Everything Else
WMI may be used to apply WDAC policies. This example is for Single Policy Format.
# Policy binary files should be named as SiPolicy.p7b for Windows 10 versions earlier than 1903
$PolicyBinary = "<Path to policy binary file to deploy>"
$DestinationBinary = $env:windir+"\System32\CodeIntegrity\SiPolicy.p7b"
Copy-Item  -Path $PolicyBinary -Destination $DestinationBinary -Force
Invoke-CimMethod -Namespace root\Microsoft\Windows\CI -ClassName PS_UpdateAndCompareCIPolicy -MethodName Update -Arguments @{FilePath = $DestinationBinary}
Removal
Signed Policies
To remove a signed policy you must follow a special process.
- Prepare a signed replacement policy that:
- includes option
6 Enabled:Unsigned System Integrity Policy - has the same PolicyID as the one it’s replacing
- has a version that greater than or equal to the existing policy
- includes
<UpdatePolicySigners> - is signed with a certificate in the
<UpdatePolicySigners>of the original policy
- includes option
- Disable the method of deploying the original policy so that it isn’t redeployed
- Group Policy, MDM, etc.
- Make the original policy inactive by replacing it with a new one that includes the following changes:
- Replace the policy rules with “Allow *” rules;
- Set option 3 Enabled:Audit Mode to change the policy to audit mode only;
- Set option 11 Disabled:Script Enforcement;
- Allow all COM objects. See Allow COM object registration in a WDAC policy;
- If applicable, remove option 0 Enabled:UMCI to convert the policy to kernel mode only.
- Restart the device
Unsigned Policies
There are two ways to remove unsigned WDAC policies: using CiTool.exe or removing them from
the file system.
CiTool.exe
Starting with the Windows 11 2022 update, CiTool.exe allows users to remove WDAC policies using
their respective GUID from an elevated command or PowerShell window.
CiTool.exe -rp "{PolicyId GUID}" -json
Then restart the device.
File system
To remove WDAC policies, the following policy file(s) must be deleted from the computer.
- For multiple policy format (replace the
PolicyId GUIDwith the GUID of the policy to be removed):<EFI System Partition>\Microsoft\Boot\CiPolicies\Active\{PolicyId GUID}.cip<OS Volume>\Windows\System32\CodeIntegrity\CiPolicies\Active\{PolicyId GUID}.cip
- For single policy format
<EFI System Partition>\Microsoft\Boot\SiPolicy.p7b<OS Volume>\Windows\System32\CodeIntegrity\SiPolicy.p7b
Then restart the device.
Examples
At first glance, implementing WDAC seems a bit daunting. However, I hope this guide will help anyone attempting to work with it.
Even before creating a WDAC policy, you always need to consider the use case for WDAC in your environment. What applications should be allowed? What needs to be blocked? What’s the best way to create secure WDAC policies while providing users with the access they need? Well, there’s unfortunately no correct answer, but Microsoft has some general recommendations for working towards proper policy. In my example here, I’ll be creating a single policy format policy to allow only Microsoft OS components, store applications, WHQL drivers, Office 365, OneDrive, and Teams. Then, I’ll add an exception in the policy to also allow signed code from an internal CA.
For the sake of brevity I won’t go into detail about how to create a code signing certificate.
Deploying Unsigned Single Policy Format
Signing the Executable
In order to add a rule to WDAC that allows signed executables from an internal CA,
you first need to have the exported code signing certificate which, in my case, is
a .pfx file. Next, you must have signtool.exe installed, which you can download
from here (make
sure that you at least install Application Verifier for Windows and Windows App
Certification Kit). Finally, sign the executable, by running the following command in
PowerShell:
& 'C:\Program Files (x86)\Windows Kits\10\App Certification Kit\signtool.exe' sign /a /f CERT.pfx /fd SHA256 /p PASSWORD EXECUTABLE.exe
This will result in the executable being signed with your desired certificate.
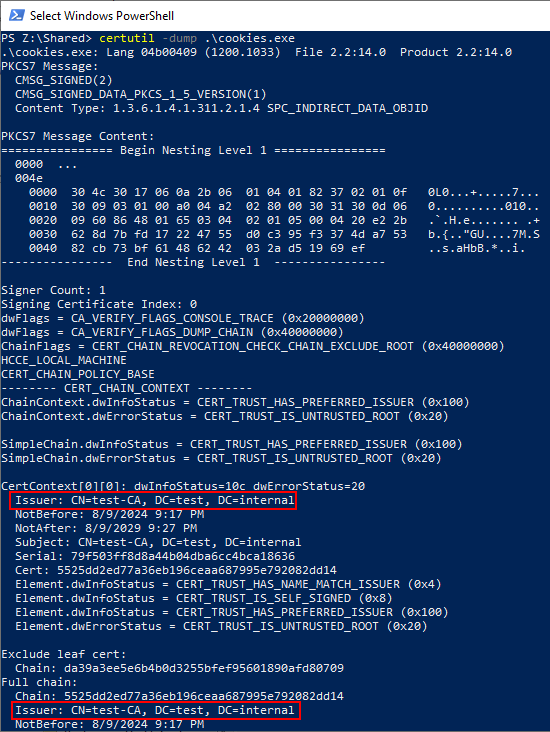
To test to see if the signing was successful, you may use the certutil command.
certutil -dump EXECUTABLE.exe
Creating and Applying the Policy
To begin creating a policy, I created a fresh Windows 10 Pro workstation virtual machine. I then downloaded and installed the WDAC Wizard from Microsoft as well as the required .NET runtime. Once the wizard was launched I was greeted by the below menu.
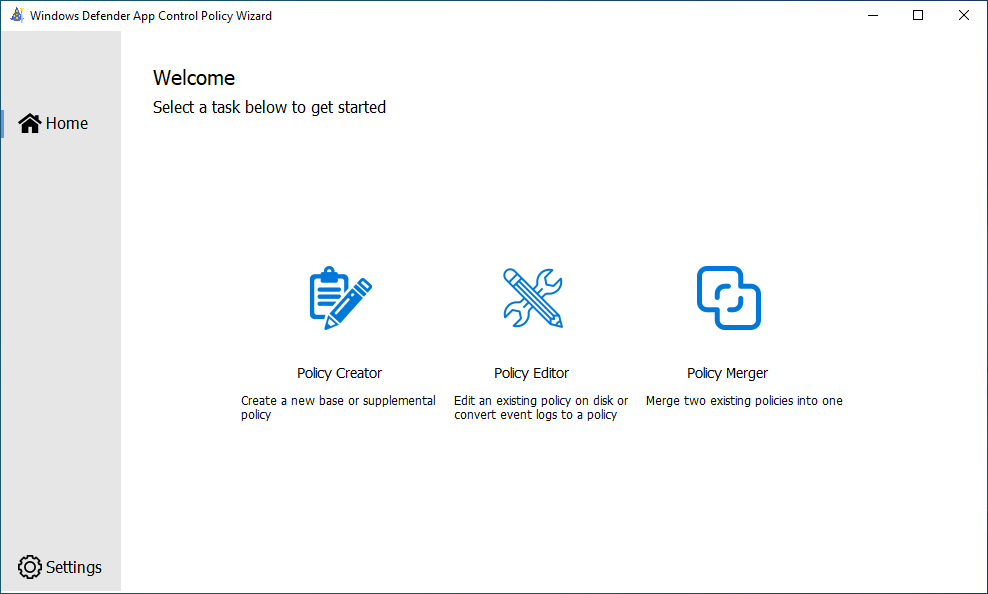
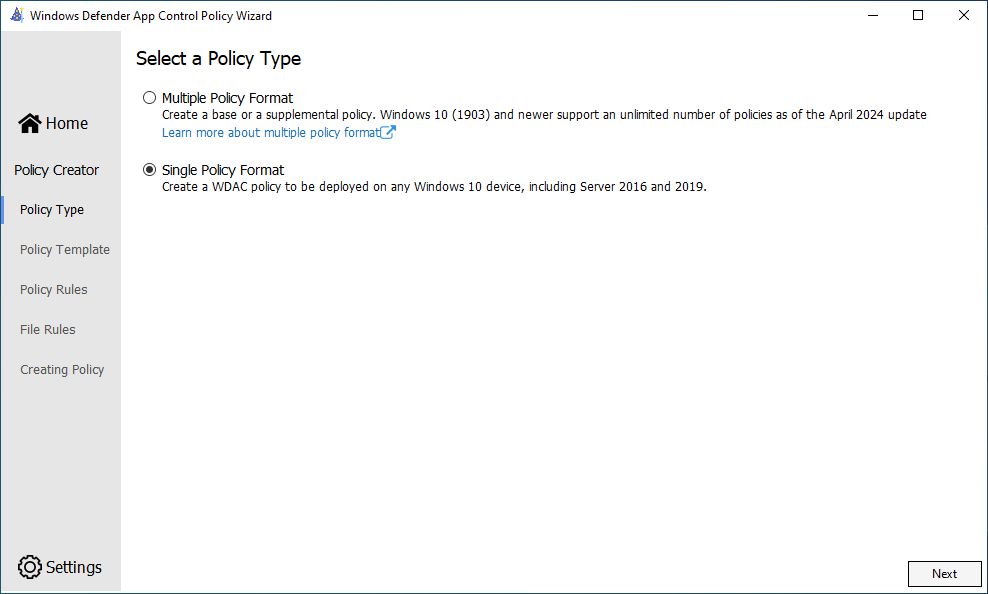
Because in this example I’m not working with pre-existing policies, I
selected the Policy Creator task. Now, there are a few things to consider
when selecting what policy type you’d like to use (see the above section on
Single vs Multiple Policy Format), however
in this example I will be creating a single policy.
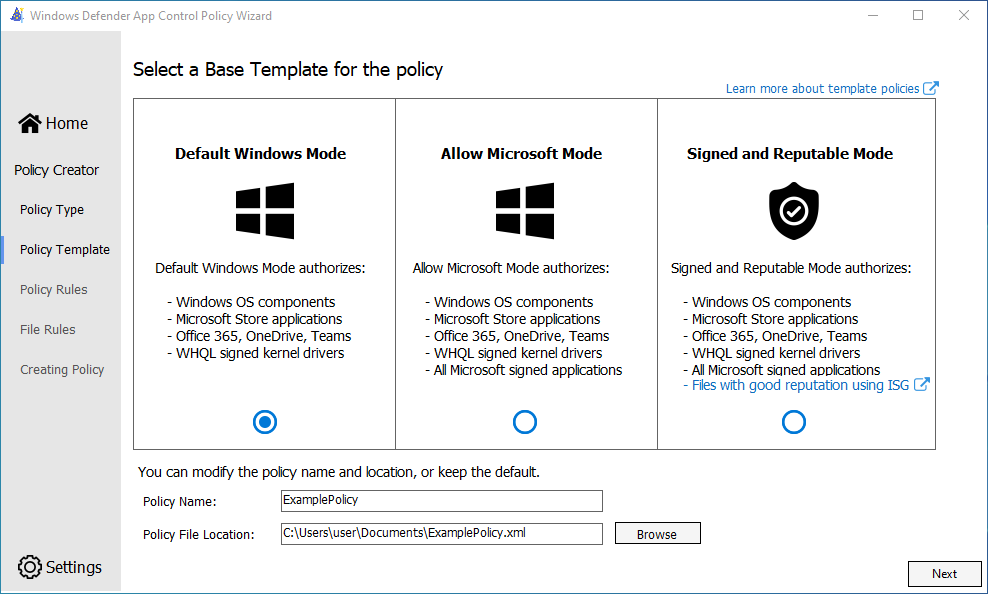
Click Next, then select the base template on which all other changes will be made on
top of. For this example, I’ll select Default Windows Mode and name the
resulting policy ExamplePolicy.
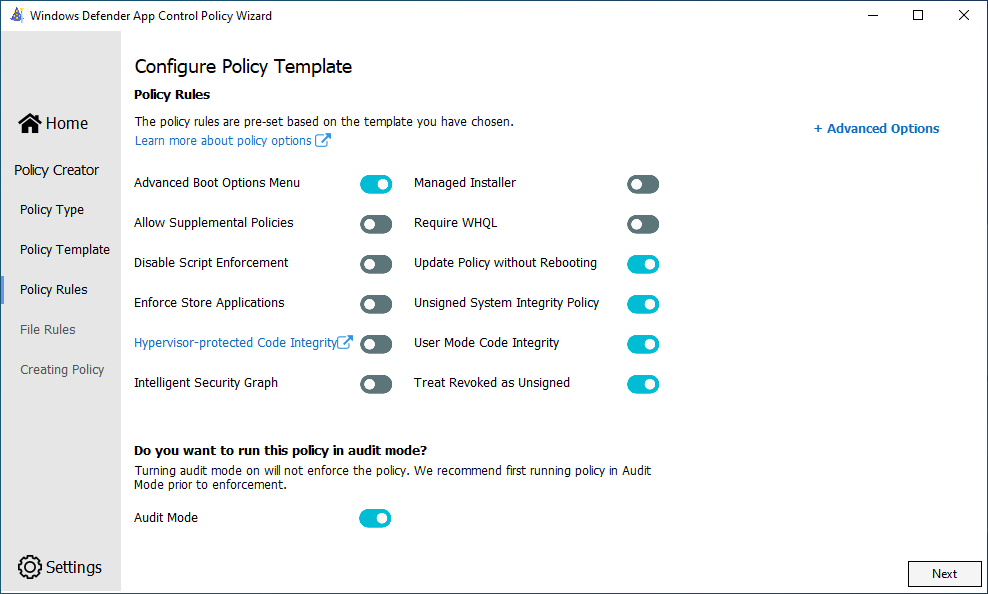
Click Next. This menu, called Configure Policy Template, allows you to fine
tune many of the underlying settings of the policy. For more information on
what each of these means, consult the Microsoft documentation.
What’s very important here, especially for first time use, is the Audit mode
setting. If this setting is turned off, anything that would be blocked by
your policy will be, meaning if you make a misconfiguration, you’ll block
applications or drivers that weren’t intended to be.
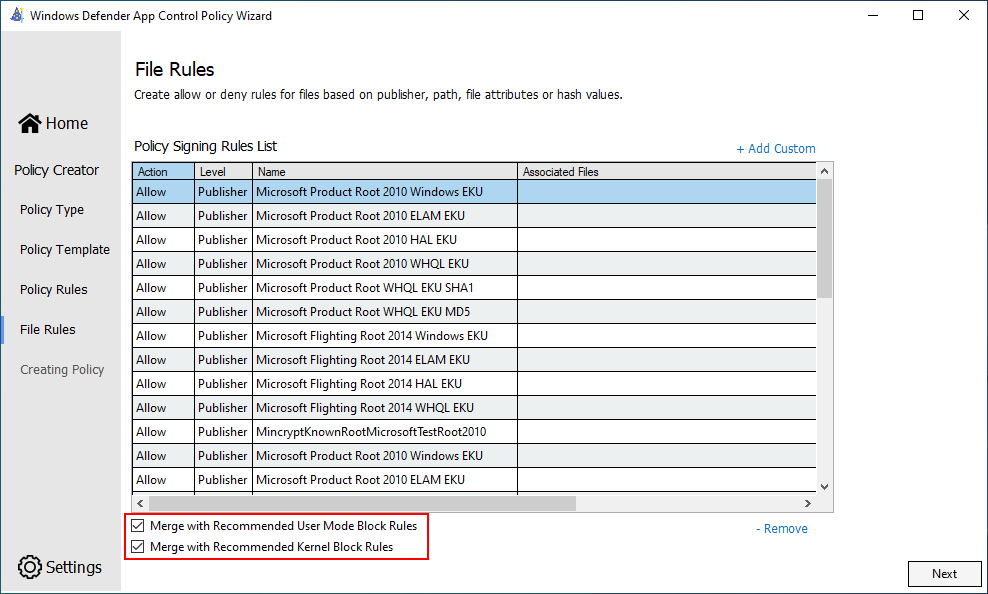
Click Next, then enable the following two settings:
Merge with Recommended User Mode Block RulesMerge with Recommended Kernel Block Rules
This should add some extra security to your policy by blocking known vulnerable drivers.
Now to add the custom policy rule regarding the internally signed executable.
First, click on + Add Custom on the top right of the Policy Signing Rules List
table. Keep everything default except for the Rule Type setting - set it to
Publisher. Then, select the signed executable that you’d like to allow
the publisher for as the Reference File. Additionally, unselect all options
except for Issuing CA and Publisher unless you have specific constraints
that would warrant the other settings.
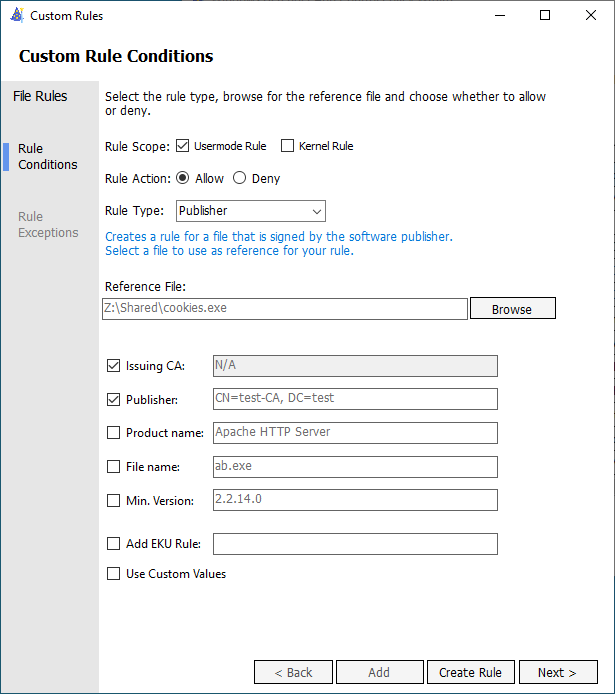
Finally, click Create Rule. Once you do this, the wizard will sometimes
say something like One or more of the file attributes could not be found.
In this example, just click Yes - this will just create a hash rule based
on the executable if creating a rule based off of publisher is not possible.
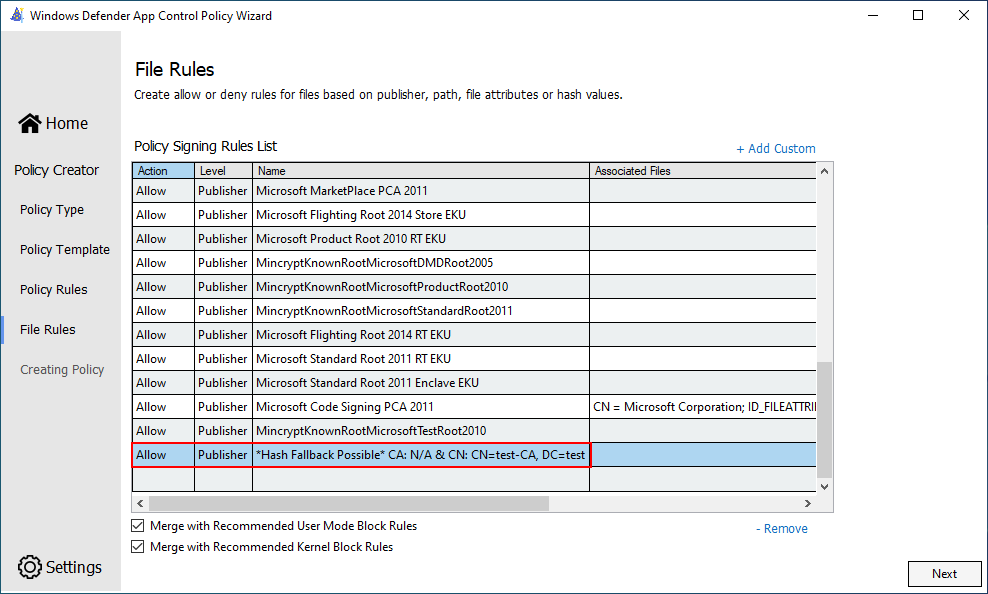
Finally, to build the WDAC policy, select Next.
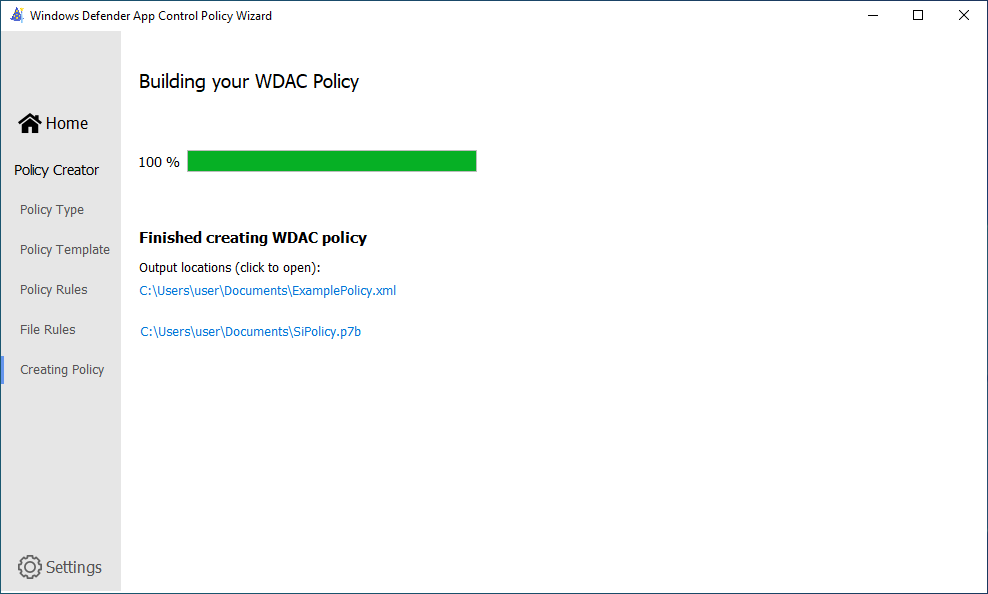
The only thing left to do is to apply the policy now. While there are
multiple ways of doing this (see the above section on deployment),
I will just use the Local Group Policy Editor to apply it on the same machine
that I generated the policy on. To do that, I first need to copy the compiled
policy (SiPolicy.p7b) to a secure location to prevent just anyone from tampering
with it. The best location is C:\Windows\System32\CodeIntegrity\. To do it on
the command line:
mv .\SiPolicy.p7b "C:\Windows\System32\CodeIntegrity\"
Next, navigate to the following path in the Local Group Policy Editor:
Computer Configuration\Administrative Templates\System\Device Guard\
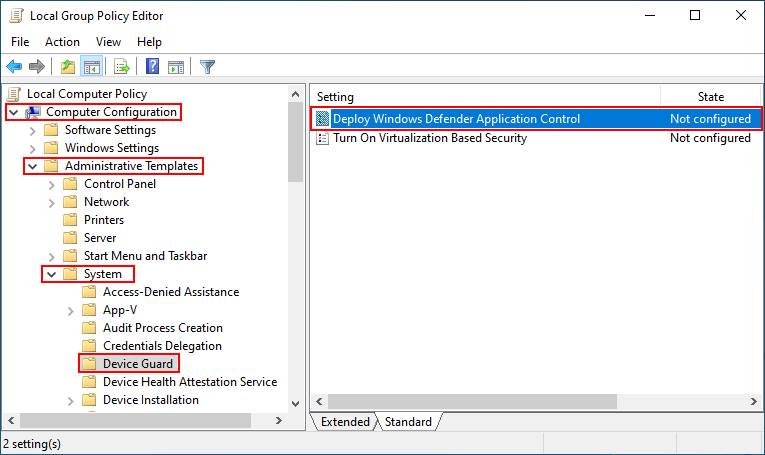
Then, enable the Deploy Windows Defender Application Control setting and
add the path to the .p7b policy file.
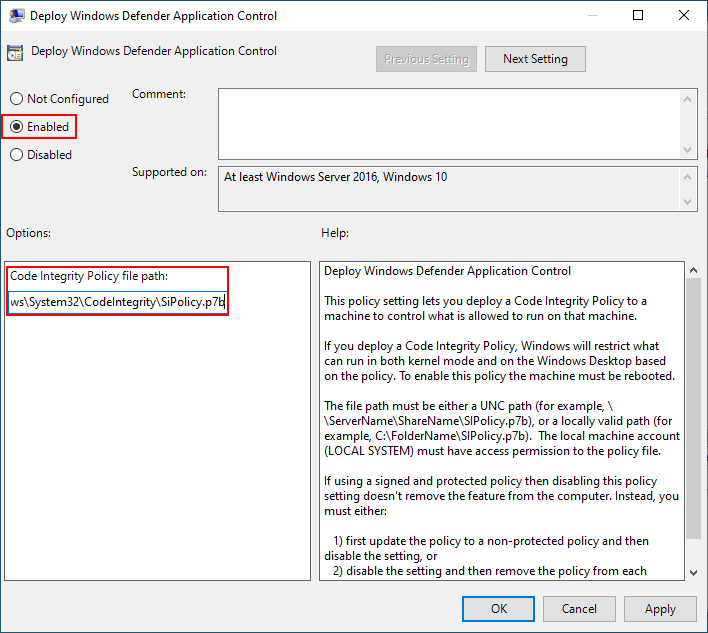
Click Apply, exit and save all work on the machine, and finally reboot to apply the changes!
Testing and Enforcing Policy
One of the biggest things to do when implementing WDAC in an environment is to test the effects of the policies on the machines that it will be used on. You don’t want to apply a WDAC policy that won’t allow users to use software required for their job!
To test the WDAC policy that we just made, I’ll first run the signed executable, then an unsigned copy using PowerShell.

One very important thing to remember when using WDAC is that regardless of the mode the policy is configured for (audit/enforce), it will log the programs it would have (or did) block. To see these events, navigate to the following path in the Windows Event Viewer:
Applications and Services\Microsoft\Windows\CodeIntegrity\Operational
There, you will see all relevant logs to WDAC. To see what programs are
specifically being blocked, simply filter the current log to display only
event ID 3076.

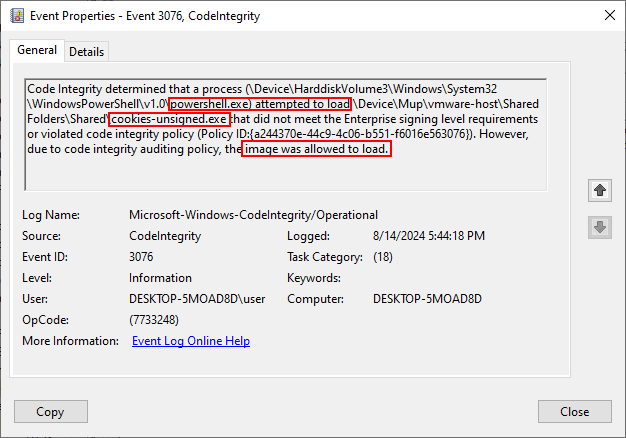
As you can see in the above log entry, powershell.exe tried to execute
cookies-unsigned.exe which, if WDAC wasn’t in audit mode, would have
been blocked. However, there is a distinct lack of logs for cookies.exe -
the signed executable, meaning that the WDAC policy is correctly allowing
executables signed by the internal certificate!
Now that we know that the operating system can function, and our signed
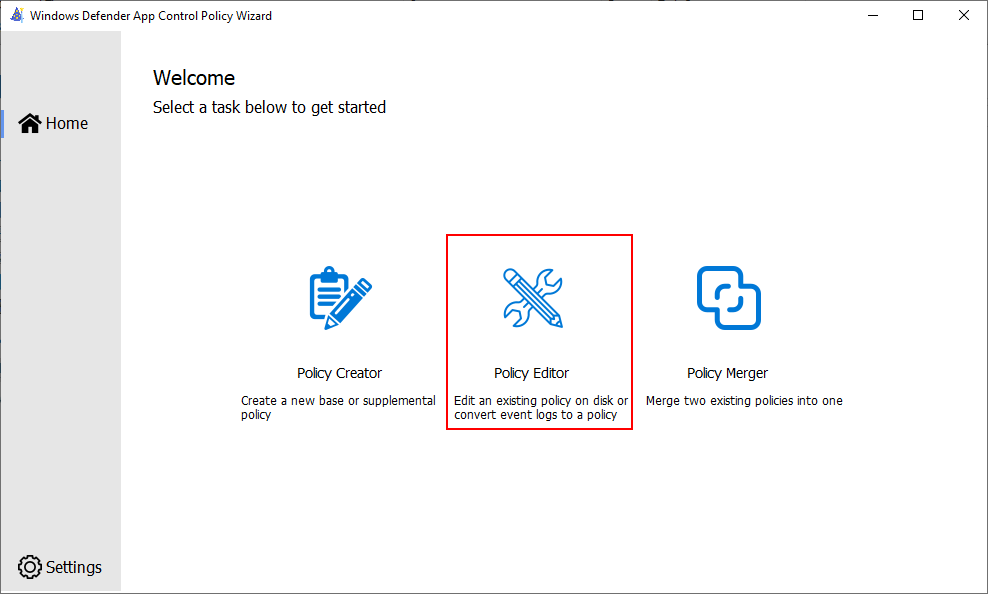
executable can run, let’s enforce the WDAC policy. To do that, open up
the WDAC Policy Wizard again and select the Policy Editor.
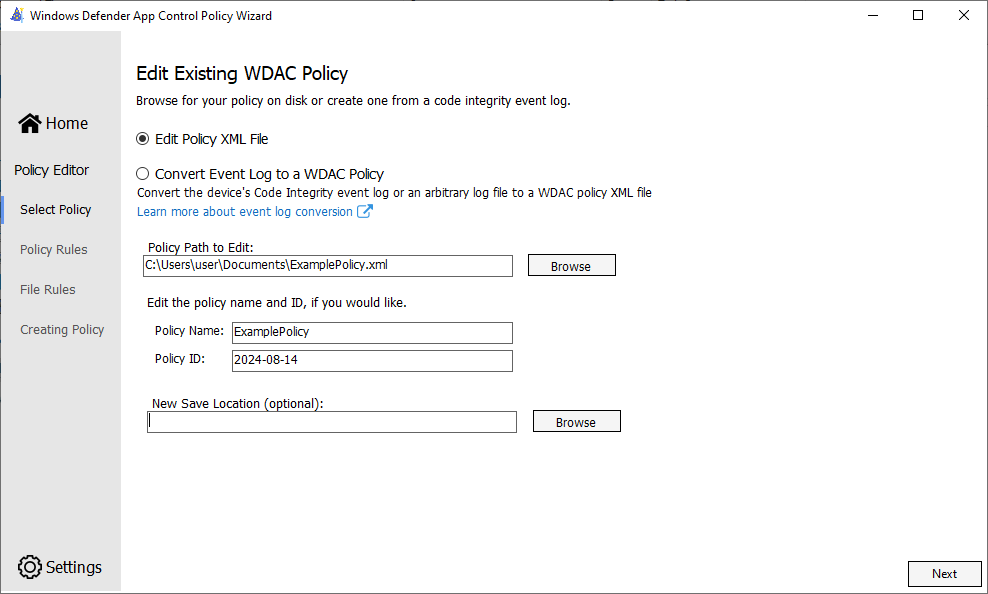
Next, select the Edit Policy XML File option, and provide the path to the
old audit policy (leave all the other default options unless you would like
to change them.)
Click next, then turn OFF Audit Mode.
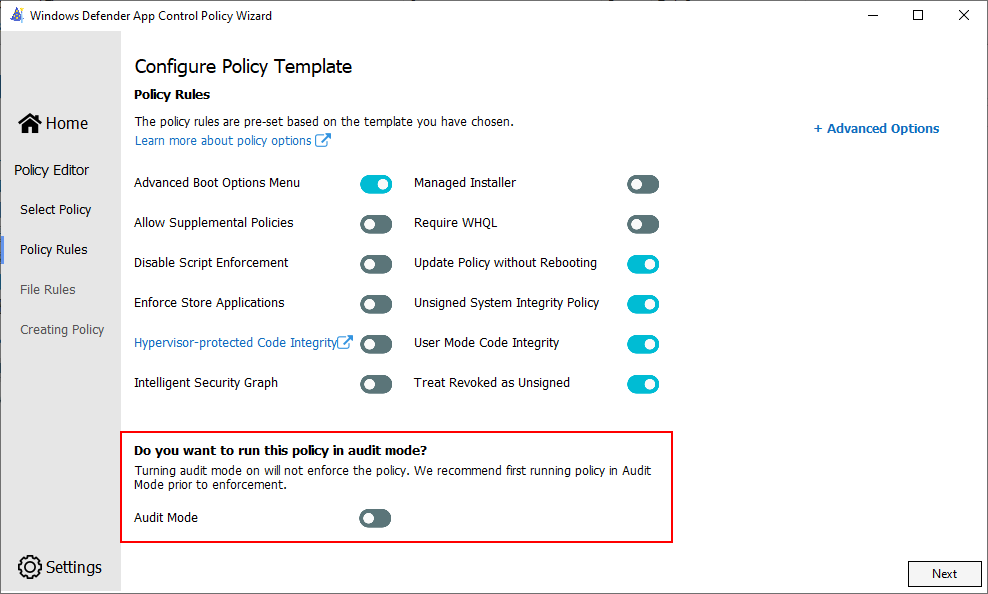
Click next, then ensure that the old settings that you configured earlier are still there. Unless you configured it into the WDAC Policy Wizard’s settings already, the checkboxes at the bottom are likely unchecked, so make sure to check those. Further, ensure that the Publisher rule to allow signed applications from the internal CA is still there.
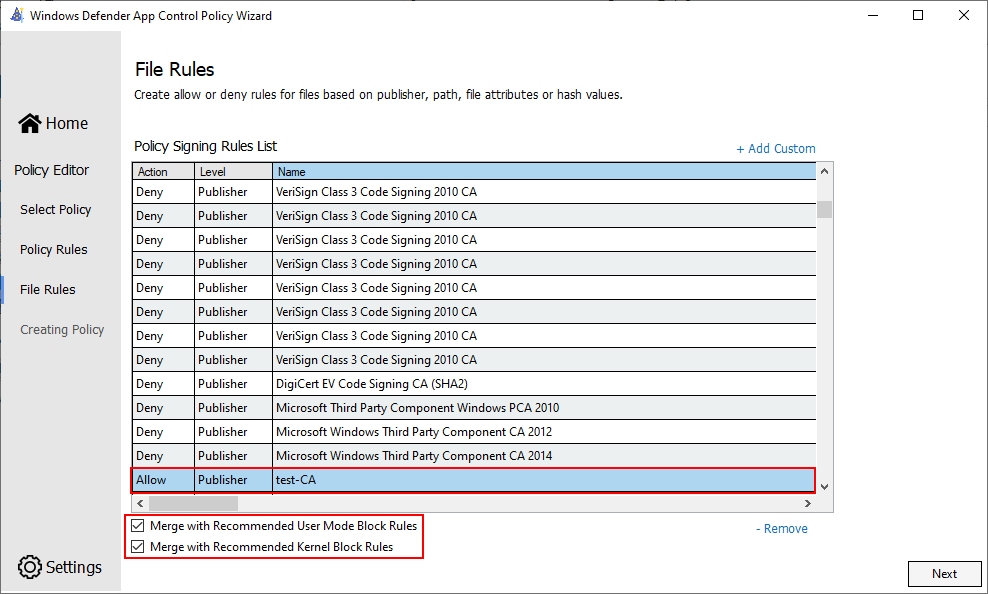
Click next to begin generating the enforced WDAC policy.
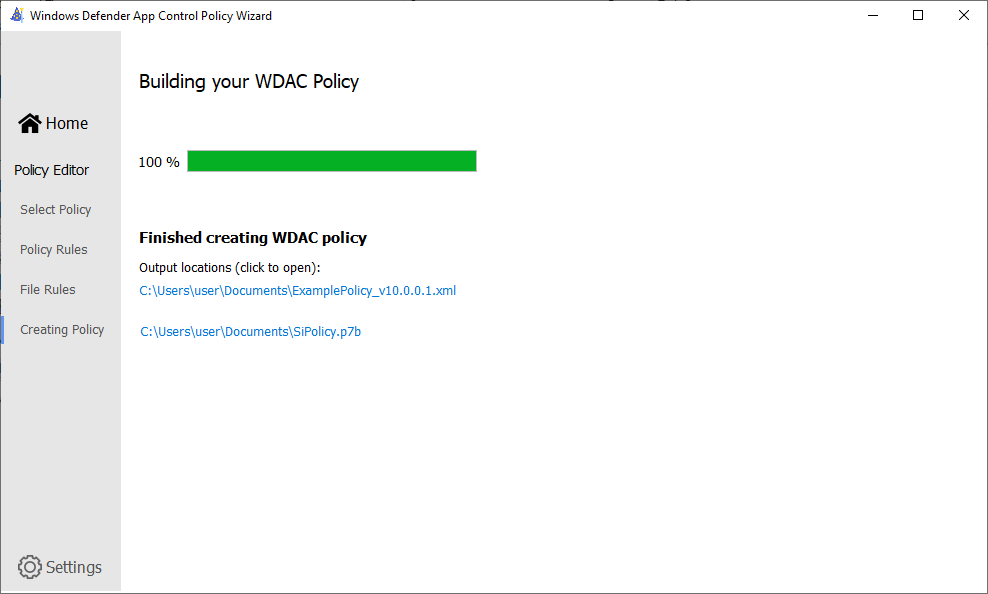
Finally, as before, copy the .p7b file to the proper location
(C:\Windows\System32\CodeIntegrity\) and, if you didn’t already, ensure that the
local group policy setting correctly points to the file (see path below).
Computer Configuration\Administrative Templates\System\Device Guard\Deploy Windows Defender Application Control
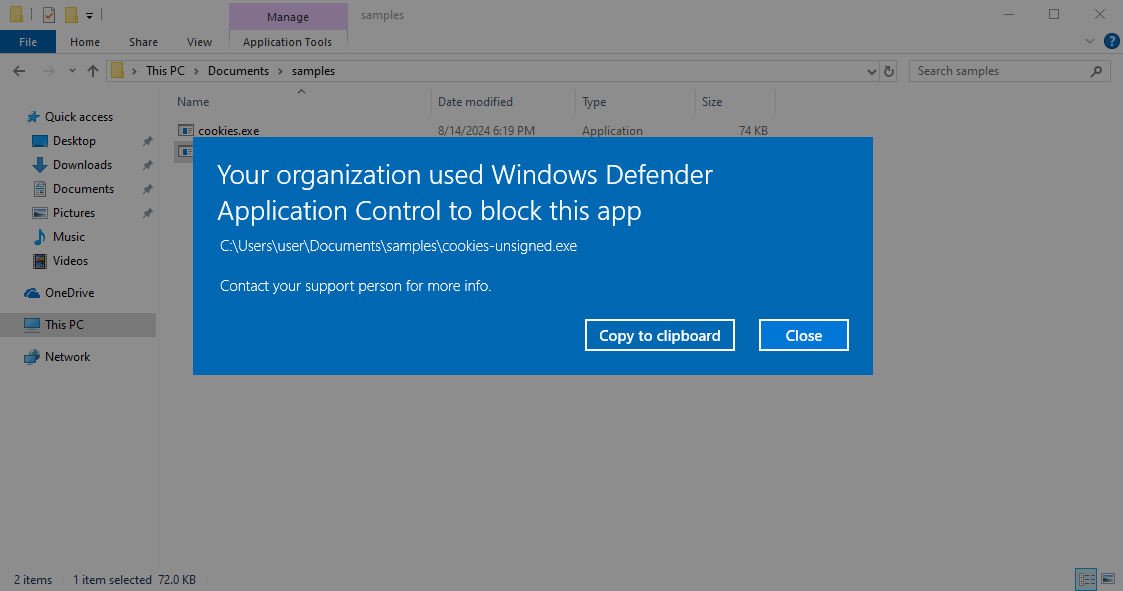
Finally, save and close everything, then reboot the machine. Once that machine is back up, you can easily test to see if WDAC blocks programs.

Or, alternatively, if I double click on the unsigned program from the file explorer:
Deploying Signed Multiple Policy Format
As mentioned earlier, signed policies can provide the highest level of protection available from WDAC. However, this comes at the cost of added complexity. In order to apply signed WDAC policies, you first need to have a proper certificate (see Signing Policies).
In this example, a multiple format policy will be used to create a baseline ruleset for allowing executables from Windows itself to run. This will then be signed by an internally issued certificate, then applied to a given Windows endpoint.
Creating the Policy
- Open the
Windows Defender App Control Policy Wizardapplication -
Select the
Policy Creatoroption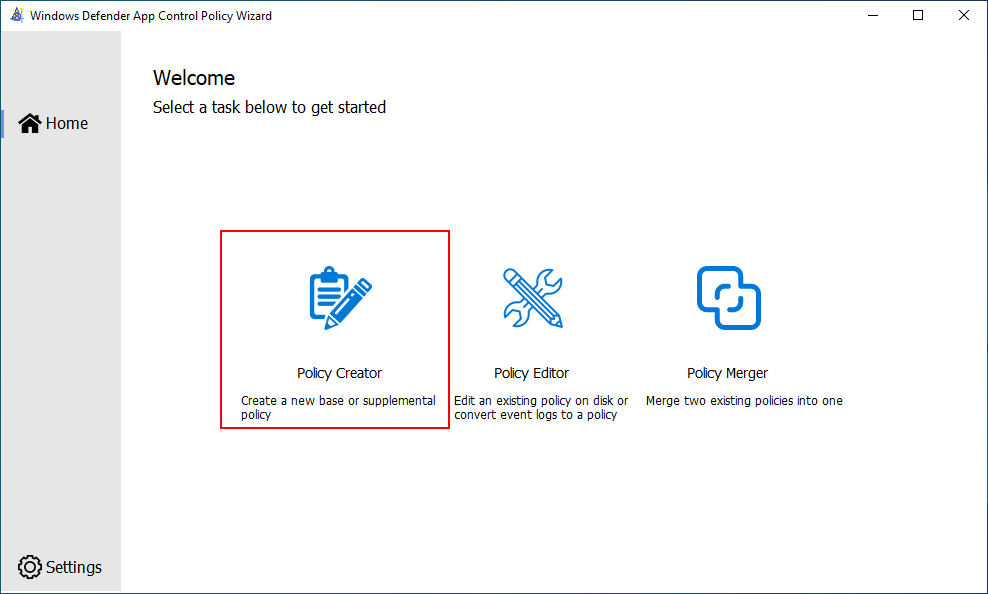
-
Select
Multiple Policy FormatandBase Policythen clickNext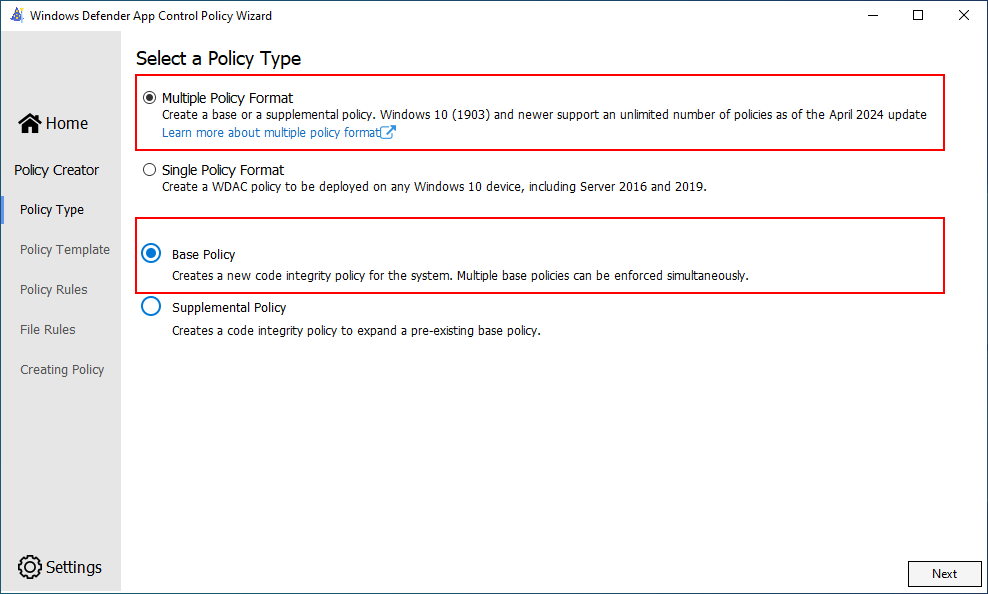
-
Select the
Default Windows Modefor the base template of the policy. For this example, the policy will be namedWDAC_Policy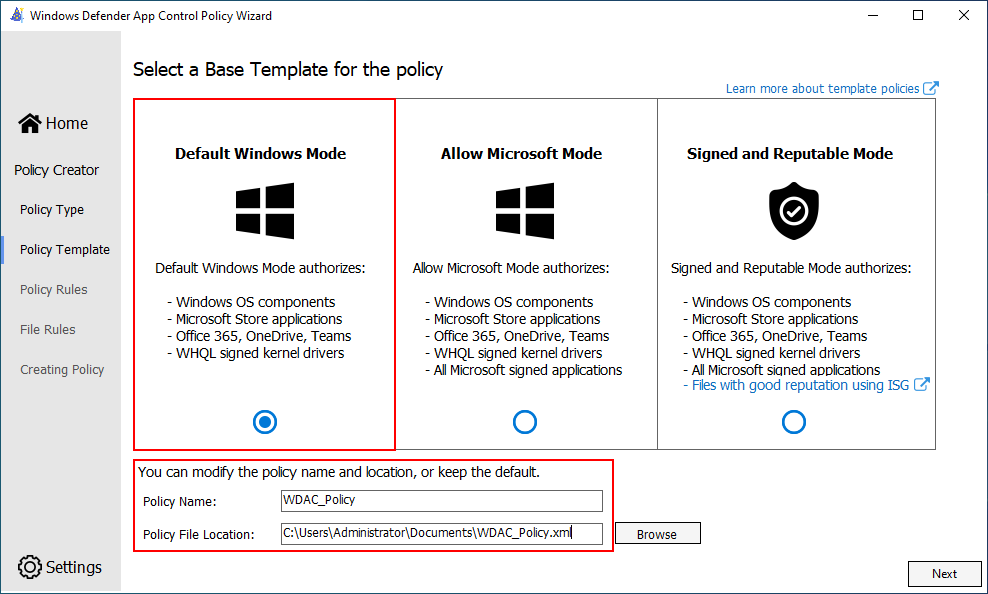
-
Leave all default options for the policy template. At the very least, ensure that
Audit Modeis turned on. SelectNext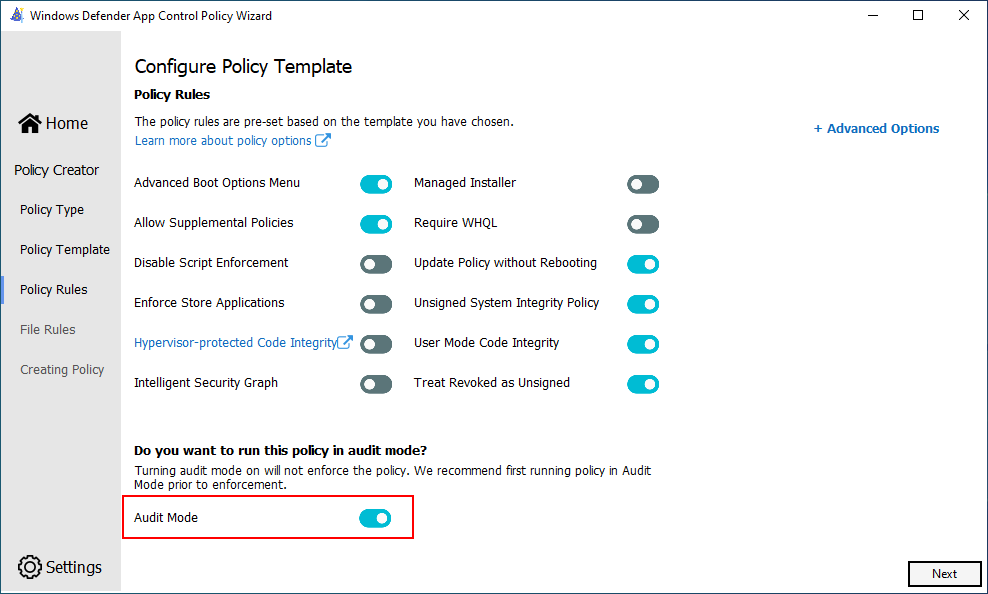
- Leave all default signing rules, but it’s recommended to check the
Merge with Recommended User Mode Block RulesandMerge with Recommended Kernel Block Rulesto block known vulnerable/malicious drivers. SelectNext
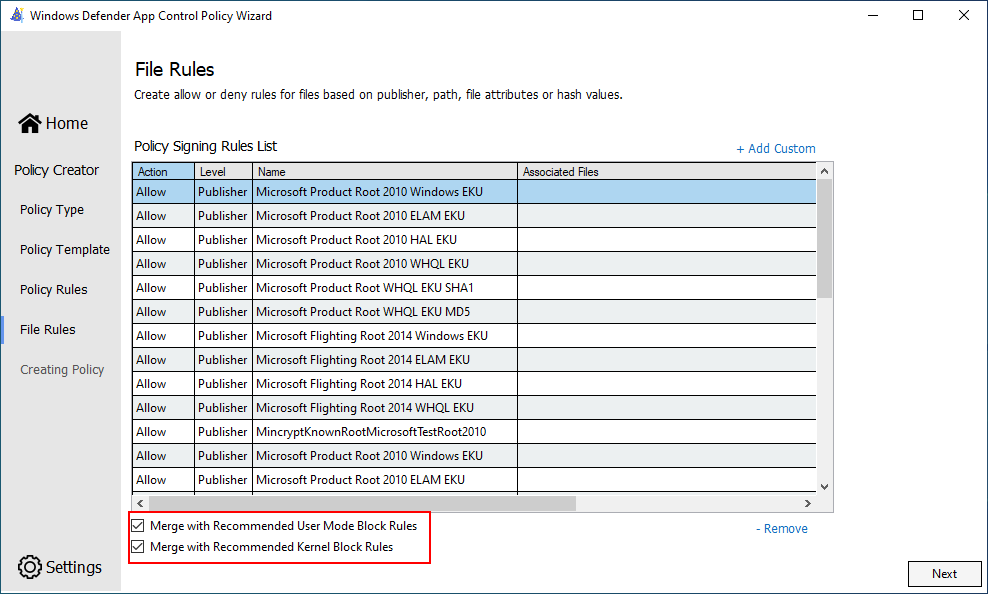
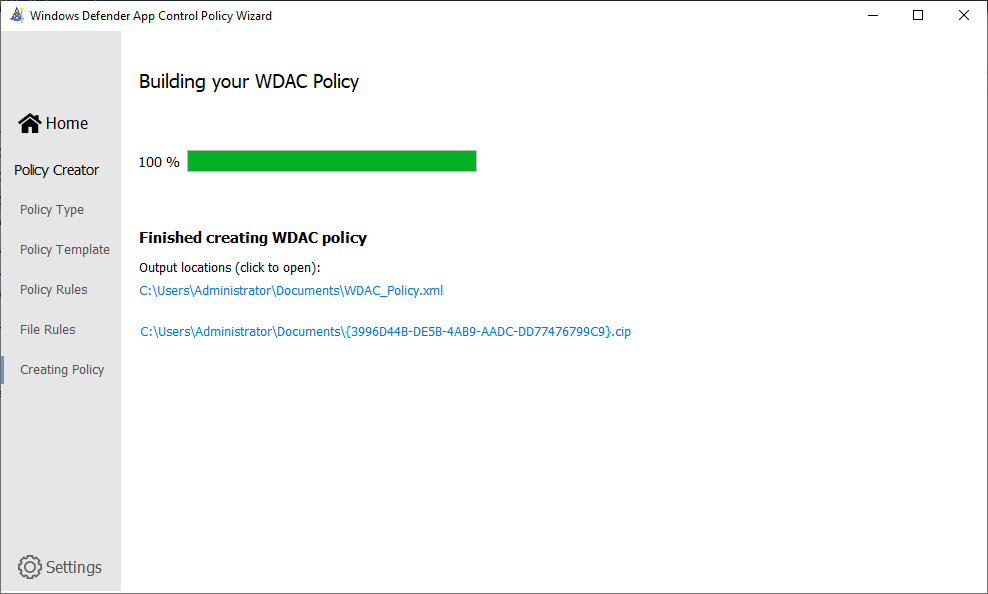
Now, the policy is correctly generated and ready for signing.
Signing the Policy
-
Ensure that the certificate is installed into the current user’s
Personalstore on the machine that you’re signing the policy on.
-
Export the certificate as a
.pfxfile, making sure to export the private key along with all extended properties and (preferably) use AES256-SHA256 encryption. In this example, I exported the certificate toC:\Windows\System32\WDACSigningPolicy.pfx - Follow the instructions outlined in the Preparing to Sign section.
Note: for this example, I used the Administrator’s
Documentsfolder instead of the Desktop.$PolicyPath=$env:userprofile+"\Documents\" $PolicyName="WDAC_Policy" $Policy=$PolicyPath+$PolicyName+".xml" cd $PolicyPath Add-SignerRule -FilePath $Policy -CertificatePath C:\Windows\System32\WDACSigningPolicy.pfx -Update -Supplemental Set-RuleOption -FilePath $Policy -Option 6 -Delete Set-RuleOption -FilePath $Policy -Option 9 $PolicyID= Set-CIPolicyIdInfo -FilePath $Policy -ResetPolicyID $PolicyID = $PolicyID.Substring(11) $CIPolicyBin = $env:userprofile + "\Documents\" + $PolicyID + ".cip" ConvertFrom-CIPolicy $Policy $CIPolicyBin
- Ensure that the signing certificate is exported as a
.pfxfile in the current directory. Then, sign the policy using signtool.signtool.exe sign -v -n "WDACSigningCert" -p7 . -p7co 1.3.6.1.4.1.311.79.1 -fd sha256 $CIPolicyBin
At this point signtool should have generated a
.cip.p7file with the same GUID as the compiled policy. THIS IS THE SIGNED POLICY - Verify that the policy is correctly signed
$SignedPolicy = 'path to signed policy file'
Add-Type -AssemblyName 'System.Security'
$SignedCryptoMsgSyntax = New-Object -TypeName System.Security.Cryptography.Pkcs.SignedCms
$SignedCryptoMsgSyntax.Decode([System.IO.File]::ReadAllBytes($SignedPolicy))
$SignedCryptoMsgSyntax.Certificates | Format-List -Property *
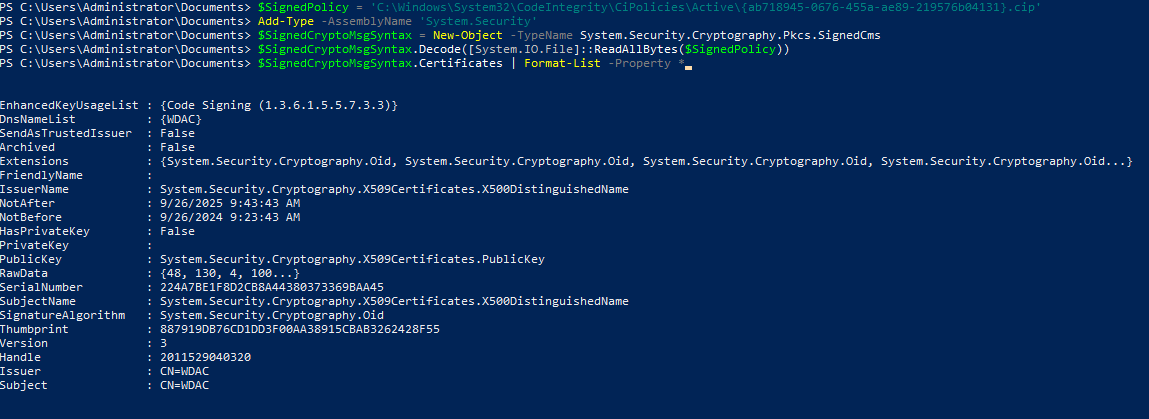
Below is an example of the expected output
Deployment
- Rename the signed policy from
.cip.p7to.cip - Move the policy to the proper location for multiple policy format
Copy-Item $SignedPolicy C:\Windows\System32\CodeIntegrity\CiPolicies\Active - Copy the policy to the system’s EFI partition
 $MountPoint = 'C:\EFIMount'
 $EFIDestinationFolder = "$MountPoint\EFI\Microsoft\Boot\CiPolicies\Active"
 $EFIPartition = (Get-Partition | Where-Object IsSystem).AccessPaths[0]
 if (-Not (Test-Path $MountPoint)) { New-Item -Path $MountPoint -Type Directory -Force }
 mountvol $MountPoint $EFIPartition
 if (-Not (Test-Path $EFIDestinationFolder)) { New-Item -Path $EFIDestinationFolder -Type Directory -Force }
Then, for every policy to push (in this case there’s just 1), copy it to the EFI partition that was just mounted. Replace
$PolicyBinarywith the path to the signed policy binary, which at this point should be inC:\Windows\System32\CodeIntegrity\CiPolicies\Active\Copy-Item -Path $PolicyBinary -Destination $EFIDestinationFolder -Force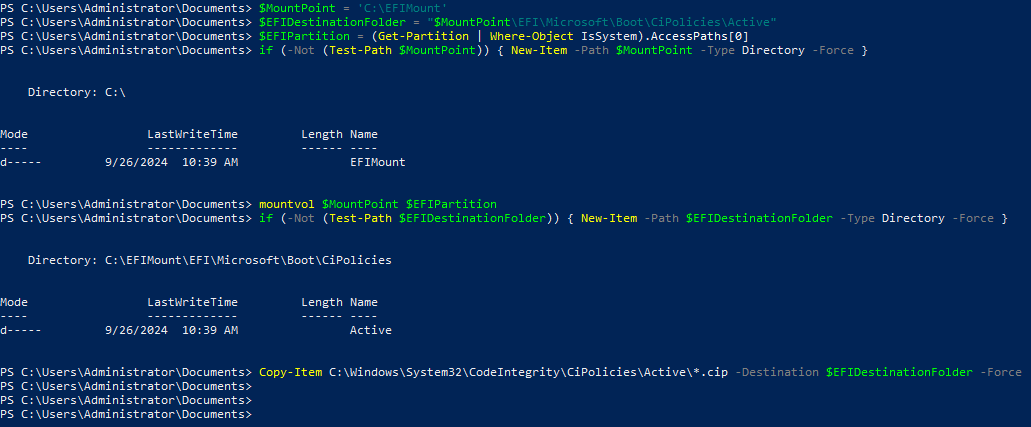
- Reboot the system
Testing
After the system has rebooted and applied the policy, run executables that should
be allowed and disallowed. For example, run powershell.exe and explorer.exe. Then
run an unsigned executable.
Now, open the Windows Event Viewer and browse to Application and Services Logs > Microsoft > Windows > CodeIntegrity > Operational
Filter the event log for event id 3076 (or 3077 if the policy is in enforce mode). If there is an application that was run that either would have been or was blocked by the policy, then an event should have been created here.

Even though PowerShell and explorer were run, those events weren’t logged
because the WDAC policy allowed it. However, because an unsigned executable
(cookies.exe) was run, that event was logged.
Enforcement
Once you’re happy with the policy, you may enforce it if you want. To do this, you need to create a new policy based off of the old one (but without audit mode).
-
Open an elevated PowerShell window
- Copy the audit policy to create the template used for the enforced policy
$EnforcedPolicyName = "WDAC_Policy_Enforced" $AuditPolicyXML = $env:USERPROFILE+"\Documents\WDAC_Policy.xml" $EnforcedPolicyXML = $env:USERPROFILE+"\Documents\"+$EnforcedPolicyName+".xml" cp $AuditPolicyXML $EnforcedPolicyXML - Give the new policy a unique ID and descriptive name
$EnforcedPolicyID = Set-CIPolicyIdInfo -FilePath $EnforcedPolicyXML -PolicyName $EnforcedPolicyName -ResetPolicyID $EnforcedPolicyID = $EnforcedPolicyID.Substring(11) - Enable rule options 9 (“Advanced Boot Options Menu”) and 10 (“Boot Audit on Failure”) to prevent boot failures
Set-RuleOption -FilePath $EnforcedPolicyXML -Option 9 Set-RuleOption -FilePath $EnforcedPolicyXML -Option 10 - Turn off audit mode (turning on enforce mode)
Set-RuleOption -FilePath $EnforcedPolicyXML -Option 3 -Delete - Convert the policy to binary
 $EnforcedPolicyBinary = $env:USERPROFILE+"\Documents\"+$EnforcedPolicyID+".cip"
 ConvertFrom-CIPolicy $EnforcedPolicyXML $EnforcedPolicyBinary

- Sign policy with the SAME certificate as the audit policy
signtool.exe sign -v -n "WDACSigningCert" -p7 . -p7co 1.3.6.1.4.1.311.79.1 -fd sha256 $EnforcedPolicyBinary -
Rename the generated
{GUID}.cip.p7file to{GUID}.cipwhereGUIDis the<PolicyID>in the enforced policy XML. - Copy the signed policy to the EFI Partition and code integrity folder
# Copy to proper location in windows filesystem Copy-Item $EnforcedPolicyBinary C:\Windows\System32\CodeIntegrity\CiPolicies\Active\ # Mount EFI partition $MountPoint = 'C:\EFIMount' $EFIDestinationFolder = "$MountPoint\EFI\Microsoft\Boot\CiPolicies\Active" $EFIPartition = (Get-Partition | Where-Object IsSystem).AccessPaths[0] if (-Not (Test-Path $MountPoint)) { New-Item -Path $MountPoint -Type Directory -Force } mountvol $MountPoint $EFIPartition if (-Not (Test-Path $EFIDestinationFolder)) { New-Item -Path $EFIDestinationFolder -Type Directory -Force } # Copy policy Copy-Item $EnforcedPolicyBinary $EFIDestinationFolder - Refresh the policies by either using the policy refresh tool or rebooting
# Replace $RefreshPolicyTool with the path of the tool itself & $RefreshPolicyTool - After refreshing the policies through which ever method, all rules should now be enforced. To test, run some allowed/disallowed applications and observe the results
Hunting Events in the Windows Event Log
- Log location:
- Full name:
Microsoft-Windows-CodeIntegrity/Operational - Event Viewer path:
Applications and Services\Microsoft\Windows\CodeIntegrity\Operational - File system location:
%SystemRoot%\System32\Winevt\Logs\Microsoft-Windows-CodeIntegrity%4Operational.evtx
- Full name:
- Important Event IDs:
3076: (Audit) A file would have been blocked, but was allowed due to the policy being in audit mode3077: (Enforce) A file was blocked due to not being allowed by the WDAC policy
- All event codes
Pros and Cons
Pros
WDAC brings a lot to the table in terms of endpoint security. It actively blocks the loading of unauthorized applications, DLLs, and drivers, while also providing an easy to use XML format to deploy. Furthermore, because WDAC policies can block both usermode and kernel mode events, it provides an extremely in depth amount of security. Paired with AppLocker, this would prove to be a formidable defense against adversary operations.
Thankfully, due to its flexibility, WDAC can be used in conjunction with existing security solutions to enrich the visibility an organization has into endpoint events. If an audit policy is deployed, having logs regarding potentially suspicious executables being run could be extremely valuable - especially if it sorts them based off of publisher. Furthermore, rather than sift through thousands of process creation events, an analyst may be able to work on looking at events for applications, DLLs, and drivers that don’t meet a certain level of integrity, such as not being properly signed.
Cons
Unfortunately, WDAC has some pretty major drawbacks. For one, deploying signed and enforced policies on every endpoint in an environment sounds like a great idea until you have to manage day to day operations. Say a new application just rolled out and you have to modify the WDAC policies to allow it. That would require an update to every endpoint’s policy! In other words, perhaps the biggest drawback with WDAC is the labor required to maintain its policies.
Furthermore, WDAC policies, although powerful, are relatively easy to misconfigure.
Therefore, having an intensive testing phase for policies is crucial. If a mistake is
made and enforced, the results could be catastrophic. For one, boot failures could
occur, which would require IT workers to go to each affected machine and manually fix
it. Second of all, WDAC policies allow for the use of file path and wildcard path
whitelisting. This can prove to be convenient, but easily exploited by adversaries.
If a path such as C:\Users\Program Files\* is whitelisted, then all an adversary
has to do to bypass the WDAC policy is operate from that path.
One of the final cons with WDAC is that if an adversary is able to gain access to the WDAC signing certificate, then they would be able to remove and/or replace in-place policies. Therefore, having tight security on your internal certificates is extremely important.
Conclusion
While WDAC is not a silver bullet for endpoint security, it is indeed powerful. Having these policies in place can serve as an effective protection against all sorts of malicious activity, but at the same time could cause untold chaos. Ultimately it’s up to you what degree of WDAC you’d like to deploy. From a simple unsigned audit policy, to a signed enforced policy, there are certainly many options for you to choose from.